

The Chilly Reality of Early Fall: Why Is Your Mini-Split Blowing Lukewarm Air?
If you find yourself troubleshooting a mini-split that blows lukewarm air in heat mode, you are not alone in your frustration. Here at Power Pro Plumbing, Heating & Air, our team fields dozens of calls just like this every September as the pre-heating season gets underway. Those brisk early mornings prompt you to switch your system from cooling to heating for the first time in months. You grab the remote, set the temperature, and wait for that familiar wave of warmth. Instead, you are greeted by a tepid, uninspiring breeze that leaves the room feeling just as chilly as before.
In Southern California's mild transition weather, heat pump performance drops are incredibly easy to miss. During the summer, your system might run effortlessly to keep the house cool, masking any underlying inefficiencies. It is only when a noticeably chilly morning forces you to turn on the heat that the problem reveals itself. This leaves you at a critical decision point: figuring out if this is a simple airflow issue you can resolve yourself, or a complex mechanical failure that requires professional attention.
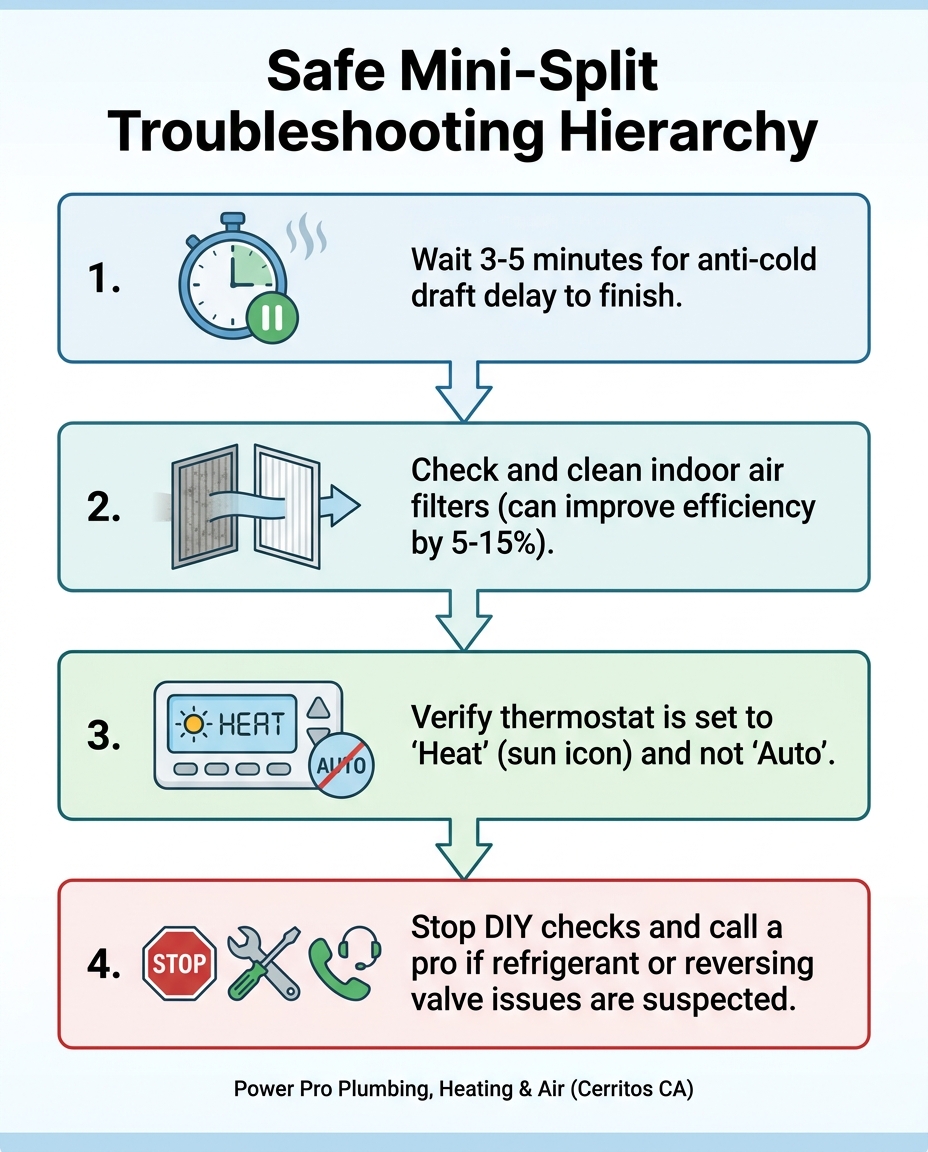
Catching this problem early prevents emergency repair needs when temperatures drop further. Understanding exactly how your mini-split systems operate helps you navigate this transition smoothly. By following a safe troubleshooting hierarchy, you can confidently determine whether your system just needs a little basic maintenance or a comprehensive professional diagnostic.
The Built-In Delay: Anti-Cold Draft Features Explained
Before you assume your system is broken, it is important to understand the normal operational sequences of modern ductless units. In our years of servicing HVAC systems, we have found that one of the most common reasons homeowners in Cerritos CA panic about lukewarm air is actually a built-in safety mechanism working exactly as designed.
The Problem: You turn the system to heat mode, the indoor unit opens its vanes, but the air coming out is weak and lukewarm for several minutes.
The Cause: Most modern ductless units feature a 3-to-5 minute warm-up delay, often referred to as an anti-cold draft feature. When you switch to heat mode, the outdoor compressor begins working to extract heat from the outside air and send it indoors. However, the indoor coil takes time to heat up. If the indoor blower fan turned on immediately at full speed, it would blast you with the cold air that was sitting in the unit, making the room feel even colder.
The Solution: The system intentionally delays the indoor fan or runs it at an ultra-low speed until the indoor coil reaches a sufficiently warm temperature (usually around 95°F to 105°F). Once the coil is hot, the fan ramps up and delivers the warm air you expect.
To help you distinguish between a normal delay and a persistent failure, look for these indicators:
• Airflow Speed — Normal Anti-Cold Draft Delay: Very low or barely noticeable at first. — Actual Heating Failure: Normal or high speed, but air remains tepid.
• Duration — Normal Anti-Cold Draft Delay: Resolves within 3 to 5 minutes. — Actual Heating Failure: Persists indefinitely without getting warmer.
• Indicator Lights — Normal Anti-Cold Draft Delay: Often a blinking "operation" or "defrost" light. — Actual Heating Failure: Solid lights, or flashing error codes.
• Air Temperature — Normal Anti-Cold Draft Delay: Gradually warms up as the fan speed increases. — Actual Heating Failure: Stays lukewarm or room temperature constantly.
If you have waited past the five-minute mark and the air is still lukewarm, you can confidently rule out the anti-cold draft feature and move on to the next troubleshooting step.
Summer Dust and Restricted Airflow: The First DIY Check
After a long, hot summer of heavy air conditioning use, your indoor unit has processed a massive volume of air. Along with that air comes dust, pet dander, pollen, and airborne particles. If you haven't cleaned your filters recently, our team can almost guarantee this buildup is the most likely culprit behind your heating woes during the September pre-heating season.
According to U.S. Department of Energy data, replacing or cleaning a dirty, clogged filter can lower a system's energy consumption by 5% to 15%. But beyond energy efficiency, restricted airflow physically prevents the system from properly distributing heat, resulting in a lukewarm output.
Here is a safe, step-by-step guide to inspecting and cleaning your reusable filters without touching any internal mechanical components. If you are ever unsure, relying on professional ductless HVAC services is the safest route.
1. Power down the unit: Always turn the system off using the remote, and ideally, switch off the breaker to ensure absolute safety.
2. Open the front panel: Gently lift the front cover of your indoor wall-mounted unit. It usually clicks and holds open on its own hinges.
3. Remove the mesh filters: Slide the reusable mesh filters up and out of their tracks. You will likely see a visible blanket of gray dust if they haven't been cleaned since spring.
4. Wash and dry: Rinse the filters under lukewarm water in your sink. You can use a drop of mild dish soap for stubborn grime. Shake off excess water and let them air dry completely. Never put wet filters back into the unit.
5. Reinstall and test: Slide the dry filters back into place, close the panel, restore power, and test the heat mode again.
How Airflow Impacts Heat Transfer
The relationship between clean filters and your indoor coil's ability to release heat is a matter of simple physics. The heated refrigerant travels to the indoor coil, making the metal fins very hot. The blower fan must pull room-temperature air across those hot fins to absorb the heat and push it back into the room. If a blanket of dust blocks that airflow, the heat stays trapped in the coil. The system registers that it is working too hard, efficiency plummets, and the small amount of air that does make it through feels weak and lukewarm. Neglecting this simple maintenance step leads to unnecessary system strain and noticeably higher utility bills.

Thermostat Settings and Defrost Mode Confusion
If your filters are clean and the system has passed its warm-up delay, the next step is ruling out user error and normal cyclical operations. Thermostat mix-ups are incredibly common, especially when transitioning between seasons in Cerritos CA. We routinely arrive on service calls only to discover a simple settings error.
The "Auto" Mode Trap: Many homeowners leave their mini-split remotes set to "Auto" mode, assuming the system will figure out what the room needs. In mild transition weather, the temperature inside the house might hover right around your set point. The system struggles to choose between heating and cooling, often blowing unconditioned, lukewarm air as it constantly cycles on and off. To fix this, manually select the Heat mode.
The Heat Mode Symbol: Look for the sun icon on your remote control. If you see a snowflake (cooling), a teardrop (dehumidification/dry mode), or a recycling triangle (auto), you are not in dedicated heat mode. Furthermore, ensure you set a distinct temperature differential. If the room is 68°F and you set the heat to 69°F, the system won't ramp up fully. Set it to 74°F temporarily to force the heating cycle to engage.
Defrost Mode: Even in relatively mild climates, outdoor coils can accumulate frost on cold, damp mornings. When this happens, the system temporarily reverses itself to melt the ice off the outdoor condenser. During this cycle, the indoor fan usually stops, but if it runs slightly, it will blow cooler air. This is a normal, temporary function that lasts about 10 to 15 minutes. For a deeper dive into this specific function, understanding the defrost cycle on your ductless mini-split can save you a lot of unnecessary worry.
Mechanical Failures: When Lukewarm Air Means Low Refrigerant
Once you have ruled out dirty filters, warm-up delays, and thermostat settings, you cross the boundary from safe DIY checks into professional diagnostics. If your mini-split is still blowing lukewarm air, you are likely dealing with a mechanical failure. In our experience, one of the most frequent causes is low refrigerant.
Heat pumps do not generate heat by burning fuel or using electric resistance strips. Instead, they use refrigerant to absorb ambient heat from the outside air, compress it to raise its temperature, and transfer it indoors. The refrigerant acts as a sponge for thermal energy. If your system is low on refrigerant, it simply cannot absorb and transfer enough heat to warm your home, resulting in a lukewarm output.
The quick rule of thumb: Refrigerant loops are entirely closed systems. A mini-split does not "consume" or "burn off" refrigerant over time like a car consumes oil. If the levels are low, it always indicates a physical leak somewhere in the line set, the flare connections, or the coils.
Finding and sealing these leaks requires specialized equipment and a licensed professional. Just last winter, our team received a call from a customer whose heating system was blowing tepid air. Our technician Luis Aguilar arrived on time, properly diagnosed a mechanical failure rather than a simple airflow block, and explained the repair process clearly every step of the way. This level of professional intervention ensures that your heat pump systems are actually repaired, rather than just temporarily patched, setting you up for reliable warmth throughout the September pre-heating season and beyond.
The Reversing Valve: The Heart of the Heat Pump
Another complex mechanical failure that we frequently see causing heat mode issues is a malfunctioning reversing valve. This component is the defining feature that separates a standard air conditioner from a heat pump.
The reversing valve is a physical brass mechanism located inside the outdoor condenser unit. Its sole function is to reverse the flow of refrigerant through the system. When the thermostat calls for cooling, the valve directs the hot, compressed refrigerant outside to release heat. When you switch to heat mode, a solenoid coil energizes, shifting a slider inside the valve to send the hot refrigerant indoors.
If the reversing valve gets stuck, or if the electrical solenoid coil that controls it fails, your system loses its ability to switch modes. Symptoms of a stuck reversing valve include:
• Stuck in cooling: The system continues to blow freezing cold air even though the remote is set to the sun icon with a high temperature.
• Stuck in the middle: The valve slider gets lodged halfway, causing the high-pressure and low-pressure refrigerant to mix. The result is a system that runs constantly but only blows unconditioned, lukewarm air.
• Defrost failure: The system cannot switch into defrost mode, causing the outdoor unit in Cerritos CA to turn into a block of ice on cold, damp mornings.
Diagnosing a faulty reversing valve or testing the electrical continuity of a bad solenoid coil is strictly professional territory. Because it involves high-voltage electricity and pressurized refrigerant, we strongly advise relying on the tools and training of experts handling heating repair and maintenance.
Why Superficial Tune-Ups Fail to Fix Lukewarm Output
When faced with a system blowing lukewarm air, it is tempting to look for the fastest, cheapest fix available. However, a superficial tune-up or a quick "refrigerant top-off" is a dangerous band-aid if the underlying leak or sensor issue isn't accurately identified.
Adding refrigerant without locating and sealing the leak means you will be paying for the exact same problem a few months—or even weeks—down the road. Furthermore, if the issue is actually a failing reversing valve or a faulty temperature sensor, adding refrigerant will overcharge the system, potentially destroying the compressor entirely.
Thorough professional diagnostics make all the difference. When our technicians evaluate a system, we check electrical components, measure refrigerant pressures with precision gauges, test the reversing valve solenoid, and ensure the indoor thermistors are reading room temperatures accurately. Recently, we helped a customer who had been experiencing recurring troubleshooting issues with a two-year-old HVAC unit. Our technician arrived on time, diagnosed the issue down to the root cause, and provided a permanent fix, ensuring the customer had all necessary information and options.
Our commitment to thorough professional diagnostics ensures you get clear, honest answers. You deserve to know exactly why your system is struggling during the September pre-heating season so you can make informed decisions about your home.
Frequently Asked Questions About Mini-Split Heating Issues
Why is my mini split running but not heating?
If your mini-split is running but not heating, it could be in a defrost cycle, experiencing a normal anti-cold draft delay, or suffering from restricted airflow due to dirty filters. The system might also be set to "Auto" mode instead of a dedicated heating setting. If you have verified the thermostat and cleaned the filters, a mechanical issue like low refrigerant is likely to blame.
How long does it take for a mini split to blow hot air?
It typically takes 3 to 5 minutes for a mini-split to start blowing hot air after you turn it on. This built-in delay allows the indoor coil to reach a warm temperature before the blower engages, preventing the unit from blasting cold air into your room. If it takes longer than 10 minutes, the system requires professional troubleshooting.
Why is my heat pump blowing lukewarm air instead of hot?
A heat pump blowing lukewarm air instead of hot is often caused by low refrigerant levels, a stuck reversing valve, or severe dust buildup on the indoor coil and filters. In mild areas like Cerritos CA, our technicians note that homeowners sometimes miss early warning signs of these issues during the summer cooling season, only noticing the tepid output when testing the heat in the fall.
How do you fix a mini split that is not blowing hot air?
You can start by cleaning the indoor air filters, verifying the remote is set to the sun icon for heat, and ensuring the temperature set point is higher than the room temperature. If these DIY steps do not fix the issue, a licensed technician must evaluate the refrigerant charge and test internal mechanical components to restore functionality safely.
When should I call a professional for mini split repair?
Call a professional immediately if you have cleaned the filters, verified the thermostat is set to heat, waited past the 5-minute anti-cold draft delay, and the air remains lukewarm. Persistent tepid air points to complex mechanical needs—like a refrigerant leak or a failing solenoid—that require specialized tools and licensing to repair safely.
Securing Reliable Warmth Before Winter Arrives
Troubleshooting a mini-split that blows lukewarm air doesn't have to be a guessing game. By starting with simple, safe DIY checks, you can easily rule out common culprits. Cleaning your indoor filters and verifying your thermostat settings are fast, effective ways to restore airflow and heat transfer. However, if those steps don't bring back the warmth, you now know that persistent lukewarm air points to complex mechanical needs like low refrigerant or a stuck reversing valve.
There is immense peace of mind that comes from knowing the exact cause of a malfunction. Catching these issues during the September pre-heating season ensures your home remains comfortable when the real cold sets in. If your DIY checks didn't restore the heat, it is time to schedule HVAC service with our team for a thorough, expert evaluation. Should you ultimately need a system replacement, keep in mind that federal tax credits or utility incentive programs may apply to qualifying heat pump installations—always verify current programs with your utility or tax professional.